How To Enhance Your Welding With Die Grinder Tool Bits For A Flawless Finish
This guide will walk you through the vital techniques for enhancing your welding projects using die grinder tool bits. By choosing the right bits and applying effective techniques, you can achieve a flawless finish that elevates your work to the next level. Whether you are a novice welder or a seasoned pro, understanding how to leverage these tools will transform your welding results, ensuring precision and quality in every joint and seam. Dive in to learn how to make the most of your die grinder and achieve that perfect finish you desire.
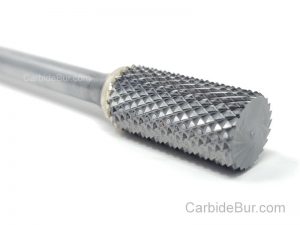
Find more carbide bur die grinder tool bits here
Selecting the Right Die Grinder Tool Bits
Finding the right die grinder tool bits is necessary for achieving that flawless finish in your welding projects. With a vast selection of options available, each bit serves specific purposes depending on the task at hand. Assessing the requirements of your welding material and the desired end result can guide you in making the right choice for your needs.
The Importance of Material Compatibility
The compatibility between your die grinder tool bits and the materials you are working with cannot be overstated. Each material, be it stainless steel, aluminum, or brass, interacts differently with tool bits. Using the right bit ensures optimal performance, reducing wear and tear, and improving the overall quality of your work.
A Breakdown of Common Bit Types
A variety of die grinder bits are available, each tailored for different applications. Understanding their shapes and purposes can significantly enhance your efficiency. For example, carbide bits excel in tough materials, while carbide burrs are ideal for shaping and removing material from metal surfaces. Furthermore, mounted stones are versatile and useful for finishing tasks, and polishing bits deliver a smooth sheen at the end of your project.
| Bit Type | Best For |
| Carbide Bits | Heavy-duty material removal |
| Carbide Burrs | Shaping and contouring |
| Mounted Stones | Finishing and shaping tasks |
| Polishing Bits | Final touch for a smooth finish |
- After evaluating the materials, you can match the bit type precisely to achieve the desired outcomes.
Each type of bit has its own unique characteristics and uses. Carbide bits are known for their durability and ability to cut through tough surfaces, making them ideal for heavy-duty removal jobs. On the other hand, carbide burrs are perfect for detailed shaping tasks due to their precision. Mounted stones are versatile options, suitable for both finishing and light removal tasks. Lastly, polishing bits help you bring a reflective shine to your projects, making them look professionally finished.
| Bit Type | Application |
| Carbide Bits | Material Removal |
| Carbide Burrs | Detail Work |
| Mounted Stones | Finishing |
| Polishing Bits | Final Finish |
- After mastering the specific functions of each type, you’ll be well-equipped for a variety of projects.
Mastering Die Grinder Techniques for Precision
Achieving precision in your welding work with a die grinder requires mastery of various techniques. By honing your skills in alignment, angle, and speed control, you can greatly enhance the finish of your welds. The right approach not only improves your efficiency but also helps achieve the flawless results that you strive for. Let’s break down the crucials that will transform your die grinding process.
Proper Alignment and Angle for Optimal Grinding
Aligning your die grinder properly with the workpiece is key to effective grinding. Holding the tool at an appropriate angle allows for better control, smooth cuts, and the reduction of excess material removal. Aim for a consistent angle of around 15 to 30 degrees between the die grinder and the surface to ensure precision without risking unnecessary damage to the material.
Speed Control: Finding Your Sweet Spot
Speed control significantly impacts the quality of your grind. Each type of grinder bit responds differently to varying speeds, so finding your optimal setting is crucial. High speeds can quickly remove material but may also lead to overheating or burnishing, while lower speeds offer better control and polish but can slow down the process.
To establish your ideal speed, experiment with different RPM settings on your die grinder. A general rule of thumb is to start at a lower speed, particularly with harder materials, and gradually increase as needed. For instance, using a carbide bit typically benefits from higher RPMs to achieve a smoother finish on stainless steel, while a slower speed might be more effective on softer alloys to avoid surface distortion. By fine-tuning your speed settings, you can make the most of your die grinder and achieve a consistent, high-quality finish in your welding projects.
Essential Preparation for a Seamless Finish
Achieving a flawless finish in your welding projects requires thorough preparation. Properly preparing both your workspace and the materials ensures the die grinder tool bits can provide the best results. This involves multiple steps, including surface cleaning and conditioning, as well as setting up the necessary safety measures and equipment carefully to maximize efficiency while reducing risks during the process.
Surface Cleaning and Conditioning
Surface cleanliness plays a major role in how well your welds bond and how effectively your finishing tools operate. Begin by removing any rust, dust, or contaminants from the metal surfaces using a wire brush or grinder before welding. Once the surface is adequately prepared, consider using solvents or degreasers to eliminate any remaining residues, providing a pristine area for your welds.
Safety Measures and Equipment Setup
Establishing a safe working environment is vital for any welding task. Ensure you are equipped with appropriate personal protective equipment (PPE), including gloves, goggles, and respirators. Additionally, set up your workspace with proper ventilation and adequate lighting to minimize hazards and improve visibility while using die grinder tool bits effectively.
Essential safety measures also involve securing your materials properly. Clamping workpieces reduces movement during welding and finishing, which can prevent accidents. Inspect your equipment before use to ensure everything is operational – this includes checking the grinder for loose parts or excessive wear on the tool bits. By prioritizing safety and preparing your workspace with the right equipment, you lay a solid foundation for achieving that flawless finish in your welding projects.
Fine-Tuning Your Welding with Advanced Techniques
Fine-tuning your welding can elevate your craftsmanship and ensure structural integrity. Advanced techniques with die grinder tool bits, such as strategic blending and smoothing, allow you to refine your welds. These methods not only enhance aesthetics but also promote durability, ensuring that your finished work can withstand the test of time.
- Understand different die grinder bits and their applications.
- Utilize variable speed settings for optimal performance.
- Practice consistent hand movement for even pressure distribution.
- Incorporate proper cooling techniques to prevent overheating.
Blending and Smoothing Techniques
Applying blending and smoothing techniques involves the strategic use of specific die grinder bits to create a seamless transition between the weld and the base materials. A cone-shaped grinding bit is ideal for smoothing out welds, as it allows you to reach tight corners while achieving contour accuracy. Taking your time during this process, with multiple passes and gradual pressure, yields the best results.
Tips for Achieving Uniform Results
Uniformity is key in welding finishes. Start by ensuring your die grinder is at a consistent speed, and apply even pressure across the surface being worked on. It’s important to keep your hand steady and maintain the same angle of approach throughout. An effective technique involves moving in the same direction as the weld bead, allowing for an even blend.
- Use light pressure initially, gradually increasing as needed.
- Inspect your work frequently for any missed spots.
- Stay patient and methodical throughout the process.
- Thou shalt achieve uniform results with practice.
Uniformity in your welding projects hinges on meticulous techniques and attentiveness to detail. Regularly check your tool bits for wear and replace them as needed. A clean working environment can also prevent distractions and help you maintain focus on delivering consistent finishes on every weld. You’ve invested time and effort; ensuring uniformity reflects that investment.
- Maintain a clean workspace without clutter.
- Ensure proper lighting to visualize your progress clearly.
- Develop a routine to check for consistent results.
- Thou shall persevere, as consistency comes with practice.
Troubleshooting Common Grinding Challenges
Grinding imperfections can hinder the quality of your welding projects, making troubleshooting vital. Look out for common challenges such as uneven surfaces, excessive heat build-up, or tool bit wear. Adjust your techniques, such as maintaining a consistent angle and pressure, to alleviate these issues. If you encounter caked-on materials, cleaning your bits frequently will ensure optimal performance. By recognizing these challenges early and implementing tailored solutions, you can ensure that your die grinder helps you achieve a proper finish every time.
Identifying and Fixing Surface Imperfections
Surface imperfections often manifest in the form of missed spots or uneven textures after grinding. To fix these issues, visually inspect your workpiece under adequate lighting. Use a finer grit bit to smooth out any rough patches, and always follow up with a polishing compound for that mirror-like finish. Identifying imperfections promptly allows you to take corrective action before moving on to the welding phase, ensuring a seamless final product.
Maintaining Your Die Grinder for Longevity
Proper maintenance of your die grinder can significantly extend its lifespan and improve performance. Regularly clean the tool to prevent metal shavings and grime from accumulating, focusing on the collet and air vents. Lubricate moving parts every few months to ensure smooth operation and replace worn bits promptly. By instituting a consistent maintenance schedule, you not only enhance the tool’s efficiency but also safeguard your investment, allowing you to tackle more projects without interruption.
A well-maintained die grinder contributes to more precise and consistent results in your welding. Inspect air filters and hoses for any signs of wear, which can impede airflow and reduce performance. Additionally, calibrating the speed settings based on the specific task at hand can enhance bit effectiveness, allowing you better control over your grinding. Keep a checklist of maintenance tasks and integrate them into your routine to optimize your die grinder’s capabilities for seamless welding finishes.
Final Words
Hence, to achieve a flawless finish in your welding projects, incorporating die grinder tool bits into your workflow is important. By selecting the appropriate bits and mastering their usage, you can effectively remove imperfections, improve joint quality, and enhance overall aesthetics. Experiment with various shapes and grit levels to find the combination that best suits your needs. Your attention to detail will not only elevate your skill set but also ensure that your welded pieces stand out with professionalism and precision.
Find more carbide bur die grinder tool bits here
Port Matching Techniques for Automotive Enthusiasts
Mastering Carbide Burs: Port Matching Techniques for Automotive Enthusiasts Most engine porting guides leave out the real secrets to using carbide burs right. If you’ve wasted time guessing the right RPM or picked the wrong [...]
Top 5 Carbide Burr Mistakes Beginners Make and How to Avoid Them
Top 5 Carbide Burr Mistakes Beginners Make and How to Avoid Them Most beginners make the same costly carbide burr mistakes without even realizing it. If you’ve struggled with rough finishes or broken bits, you’re [...]
The Expert’s Guide to Chamfering and Edge Breaking with Carbide Burrs
The Expert's Guide to Chamfering and Edge Breaking with Carbide Burrs Most metal shaping tools only scratch the surface. If your edges still feel rough or your welds aren’t smooth, you’re missing a key step. [...]
The Ultimate Guide to Using Carbide Burrs on Aluminum Without a Hitch
The Ultimate Guide to Using Carbide Burrs on Aluminum Without a Hitch Clogged carbide burrs can turn your aluminum machining project into a frustrating mess fast. You’ve probably wasted hours scraping off gunk instead of [...]
Your Go-To Welding Tools for Fast and Effective Cleaning
Carbide Burrs: Your Go-To Welding Tools for Fast and Effective Cleaning Welding cleanups often drag on longer than they should, costing you time and precision. If you’re tired of scrubbing weld spatter that just won’t [...]
Practical Burr Maintenance Tips for Cost-Savvy Machinists
Practical Burr Maintenance Tips for Cost-Savvy Machinists Most machinists replace carbide burrs too late or too soon, wasting both time and money. Your tools wear down faster when you miss the signs to replace carbide [...]
Jewelry Making and Engraving Techniques Using Carbide Burs
Jewelry Making and Engraving Techniques Using Carbide Burs Carbide burs aren’t just for rough cuts or quick fixes—you’re missing out if you think that’s all they do. These small tools can add precision and detail [...]
How to Choose Between Single Cut and Double Cut Carbide Burrs
Master Your Projects: How to Choose Between Single Cut and Double Cut Carbide Burrs Picking the wrong carbide burr can turn a simple project into a frustrating mess. You’ve got single cut burrs and double [...]
Achieve Precision with the Right Carbide Burr Usage and RPM
Achieve Precision with the Right Carbide Burr Usage and RPM Most people run carbide burrs way too fast or too slow without realizing it. That’s costing you time, tool life, and the smooth finish you [...]
Why Carbide Burrs Outshine Grinding Wheels in Woodworking and Metalworking
Why Carbide Burrs Outshine Grinding Wheels in Woodworking and Metalworking Grinding wheels have long been the go-to for shaping metal and wood, but they often fall short when precision work is on the line. If [...]
Choosing the Best Burr Shapes and Tools for Flawless Metalworking
Choosing the Best Burr Shapes and Tools for Flawless Metalworking Removing burrs can feel like walking a tightrope—one wrong move, and your parts get damaged. If you want clean edges without the risk, mastering deburring [...]
Essential Metalworking Tips for Aluminum
Keep Your Carbide Burrs Running Smooth: Essential Metalworking Tips for Aluminum Clogged carbide burrs slow down your aluminum machining and wreck your finish. You’ve probably tried pushing harder or changing speeds, only to see the [...]
Leave A Comment
You must be logged in to post a comment.