How To Remove Excess Material After Welding Using Die Grinder Tool Bits
Welding often leaves behind unwanted material that can impact the aesthetics and functionality of your project. If you want to achieve a smooth, professional finish, learning how to effectively remove this excess material with die grinder tool bits is crucial. In this guide, you’ll discover the right techniques and tips to transform your welds into clean surfaces without compromising the integrity of your work. Get ready to enhance your skills and produce flawless results with the right approach and tools.
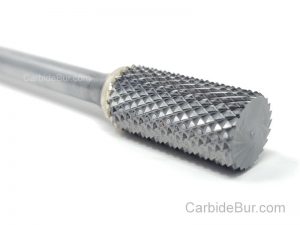
Find more carbide bur die grinder tool bits here
Choosing the Right Die Grinder Tool Bit for Your Project
To achieve the best results in your welding cleanup, selecting the appropriate die grinder tool bit suited for your specific project is imperative. Different tasks, such as deburring, smoothing, or shaping, demand distinct tool characteristics. By analyzing your project’s unique requirements, you can maximize efficiency and ensure optimal surface finishes, all while prolonging the lifespan of your tools.
Understanding Different Materials and Their Requirements
Each material you encounter has unique properties and reacts differently to cutting and grinding processes. For instance, aluminum requires softer abrasives to prevent tearing, while stainless steel might demand a harder bit. By understanding the specific requirements for each material, you can select a die grinder bit that minimizes wear and maximizes effectiveness during your welding cleanup.
Factors Influencing Tool Bit Selection: Shape, Size, and Grit
Choosing the right shape, size, and grit of your die grinder tool bit can significantly affect your project outcomes. Bits come in varied shapes such as cylindrical, flame, and ball end, each serving particular purposes. Likewise, the size will determine accessibility and precision, while grit levels (coarse to fine) dictate the aggressiveness and finish quality of the material removal. Perceiving these factors correctly will significantly enhance your efficiency and precision during the post-weld process.
- Assess the project goals to determine whether a coarse or fine grit is necessary.
- Consider the size of the area you need to access when selecting a bit size.
- Select a shape that aligns with the specific contour or design of the weld joint.
- Perceiving the material type can inform your choice for optimal results.
Understanding how the shape and size of your die grinder tool bit complements the project scope is key for achieving precision. A cylindrical bit is ideal for reaching into narrow sections, while a flame-shaped bit is better at contouring the edges. The grit also plays a pivotal role; coarser bits remove material rapidly but leave a rough finish, while finer bits are perfect for refining surfaces. This combination of shape, size, and grit will ultimately determine the effectiveness and quality of your weld cleanup process.
- Match the tool shape to the geometry of the weld area you are working on.
- Utilize larger bits for faster material removal in flatter areas.
- Employ finer bits for detailed work and achieving smooth finishes.
- Perceiving these aspects can lead to more impressive results on your project.
Preparing Your Workspace for Efficient Material Removal
Creating an efficient workspace is key to effective material removal after welding. Clear any clutter from your work area to ensure you have ample space to maneuver while using your die grinder. A well-organized environment not only promotes safety but also enhances your speed and precision when removing excess material. Consider using a sturdy workbench and ensuring that adequate lighting illuminates the entire workspace, making it easier to spot and address any imperfections.
Find more carbide bur die grinder tool bits here
Safety First: Essential Personal Protective Equipment
PPE must be a priority in your workspace. Equip yourself with safety goggles to shield your eyes from flying debris and a face shield for added protection. Wearing gloves will prevent cuts and burns, while a dust mask or respirator guards against inhaling harmful particles. Long-sleeved clothing and steel-toed boots enhance your safety further, so gear up before you start working with the die grinder.
Organizing Tools and Materials for Accessibility
Efficient organization of your tools and materials will save time and help avoid frustrations during your project. Keep your die grinder and its various bits within easy reach, along with any additional tools you might need, like clamps or measuring devices. Consider using toolboxes or rolling carts to sort your equipment by type or size, making it simple to grab what you need without wasting time searching.
Utilizing pegboards or wall-mounted storage systems can significantly improve accessibility, allowing you to see all your tools at a glance and reducing the chance of misplacing them. Labeling drawers or containers can further enhance your workflow, especially when you’re deep into complex tasks. By setting up your workspace with a focus on organization, you’ll be able to transition smoothly between steps, keeping material removal efficient and straightforward.
Mastering the Technique: Proper Use of Die Grinder Tool Bits
Using a die grinder effectively requires a firm grasp of technique. Start by selecting the appropriate tool bit for the material and task at hand, ensuring compatibility to promote smooth operation. Keeping a consistent angle during material removal helps maintain control over the die grinder, which is necessary for precision work. Strive for steady pressure on the tool while moving it along the weld seams to achieve an even finish. Practice makes perfect, and as you refine your approach, you’ll find that completing your projects becomes more efficient and seamless.
Grip and Positioning: Ensuring Control and Precision
Firmly grip the die grinder with both hands, positioning your dominant hand near the trigger and your other hand guiding the tool for stability. This dual-handed approach allows you to maneuver the grinder comfortably while maintaining control. Position the tool at an angle that suits the contours of the workpiece. Balance is key, so ensure that your body is positioned to apply even pressure without straining. Adjusting your stance as needed can also significantly enhance your ability to maintain precision during the grinding process.
Optimal Speed Settings: When and How to Adjust
Speed settings should be adjusted based on the material being worked on and the desired finish. For softer materials like aluminum, lower speeds help prevent overheating and reduce the risk of damaging the surface. Conversely, harder metals may require higher speeds to achieve efficient material removal. Assess the grinding bit being used as well; some perform better at specific speeds, so always consult the manufacturer’s recommendations to maximize effectiveness.
Setting the right speed not only affects performance but also impacts tool longevity. For example, using a high-speed setting on a carbide burr can lead to rapid wear and tear, while operating at too low a speed on stainless steel can cause binding. Adjust your speed gradually, testing the surface as you go to find the optimal range—typically between 12,000 and 30,000 RPM—where you achieve the best results. Keep an eye on the material and your grinder; if you notice excessive strain or resistance, it’s a signal to tweak the speed setting for a smoother grind.
Troubleshooting Common Issues During the Grinding Process
Grinding can present various challenges that could hinder your project. Addressing issues early on, such as inconsistent surface finishes or unusual vibrations, ensures the material removal process remains smooth. Additionally, knowing how to handle these common problems will not only improve your workflow but also extend the life of your tools and improve the quality of your work. Let’s look into two frequent complications you might encounter during grinding.
Dealing with Overheating and Material Glazing
Overheating occurs when excessive friction builds up during grinding, leading to a risk of burn marks on the workpiece or even damage to the grinding bit. To combat this, reduce the pressure applied during grinding and keep your grinding bits cool with intermittent pauses or using cutting fluids designed for metalworking. This will help preserve both the bit and the integrity of the material.
Recognizing Wear Patterns: Knowing When to Replace Bits
Monitoring the wear on your grinding bits is vital for maintaining effective material removal. Signs of excessive wear include dull edges, color changes due to overheating, and visible chips or cracks. If you notice that your bit is no longer producing consistent results, it’s time for a replacement. Keeping a regular check can save you from further issues down the line.
Identifying wear patterns is a skill that develops over time, revealing insights about when to replace your bits. Look for changes in the performance of your bits, such as decreased grinding speed or more aggressive vibrations during use. A bit that struggles to cut efficiently not only wastes your time but can also compromise the quality of your work. Regularly inspect your tools; a dull bit can lead to overheating and potentially ruin your project, making timely replacements vital for maintaining your workflow and the quality you strive for.
Finishing Touches: Achieving a Smooth Surface After Grinding
Achieving a smooth surface after grinding is key to a professional-looking weld. This step not only improves aesthetics but also ensures optimal performance and longevity of the welded joint. Finishing touches involve employing the right tools and techniques to eliminate any marks or irregularities left from the grinding process. By focusing on precision and technique, you can transform your welds into seamless works of art.
Using Sanding Pads and Flap Discs for Flawless Finishing
Utilizing sanding pads and flap discs can elevate your finishing process significantly. These tools are designed to provide a finer finish compared to standard grinding bits, allowing you to smooth out the surface while preserving the shape and integrity of your weld. Sanding pads can contour to different shapes, while flap discs deliver a consistent surface finish with ease, making them indispensable for achieving a flawless appearance.
Final Inspection: What to Look for in a Quality Finish
Your final inspection should focus on several key characteristics to ensure the quality of the finish. Look for a smooth, uniform surface free from pits, gouges, or visible scratches. The weld should blend seamlessly with the surrounding metal, showcasing even penetration without any discrepancies in height or profile. Color consistency and a shiny finish can be indicators of a well-executed job, while excessive discoloration may suggest overheating during the process.
During the final inspection, take the time to run your fingers over the surface to detect any imperfections or rough spots. A smooth touch should be the goal, as it can directly impact the overall functionality of the welded component. Light up the weld with a flashlight to catch any blemishes that may not be visible under normal lighting, and use calipers or gauges to measure the weld’s height against the base material to ensure conformity. Investing attention into this step can prevent issues during service, leading to a more durable and visually satisfying end product.
To wrap up
So, by using die grinder tool bits effectively, you can efficiently remove excess material after welding, enhancing the quality and aesthetics of your work. Make sure to choose the right bit for the job, maintain a steady hand, and work methodically to achieve the desired results. Regularly inspect and maintain your tools for optimal performance. By incorporating these techniques into your workflow, you can ensure a cleaner finish and a more professional outcome in your welding projects.
Find more carbide bur die grinder tool bits here
Preventing Carbide Burr Loading
Mastering Cutting Efficiency: Preventing Carbide Burr Loading Carbide burr loading slows your work and wears down your tools faster than you realize. When debris clogs your burrs, cutting efficiency drops and your project quality suffers. [...]
The Essential Toolkit for Perfect Weld Finish Quality
The Essential Toolkit for Perfect Weld Finish Quality Most welders underestimate how much the right weld cleanup tools impact their final result. Skipping proper cleanup can leave your metalwork rough and weak, costing you time [...]
How to Choose the Best Rotary Tool for Your Fabrication Shop
How to Choose the Best Rotary Tool for Your Fabrication Shop Most fabrication shops waste hours on rotary tools that slow work down and wear out fast. You don’t need another tool that promises everything [...]
Double Cut or Single Cut for Your Next Project?
The Ultimate Carbide Burrs Guide: Double Cut or Single Cut for Your Next Project? Picking the right carbide burrs can make or break your project’s finish. You’ve likely faced the choice between double cut burrs [...]
Finding the Perfect Burr for Clean Results
Carving and Finishing Aluminum: Finding the Perfect Burr for Clean Results You’ve struggled with burrs that clog and leave rough edges on aluminum. Getting clean cuts on this soft metal isn’t about just any tool—it’s [...]
Mastering the Art of Removing Broken Bolts with Carbide Burrs
Mastering the Art of Removing Broken Bolts with Carbide Burrs Broken bolts can bring your mechanical repair to a grinding halt, wasting hours and testing your patience. If you’ve struggled with stuck or snapped fasteners, [...]
Extending the Life of Your Carbide Burrs
Cutting Tool Durability: Extending the Life of Your Carbide Burrs Carbide burrs wear out faster than you might expect when the wrong factors come into play. If you don’t understand the key elements affecting carbide [...]
Carbide Burrs That Excel with Cast Iron
From Shaping to Finishing: Carbide Burrs That Excel with Cast Iron Machining cast iron can wear down your tools faster than you expect and create tough-to-handle dust. Finding the best carbide burr for cast iron [...]
How to Choose the Perfect Carbide Burr for Your Projects
Welding Made Easy: How to Choose the Perfect Carbide Burr for Your Projects Most welders waste time switching between dull or wrong tools without realizing it. Choosing the right carbide burr can cut hours off [...]
Metal Polishing Techniques for Flawless Steel Edges
From Sharp to Smooth: Metal Polishing Techniques for Flawless Steel Edges Sharp, jagged edges from plasma cutting can turn a solid project into a safety risk. Tackling those rough spots isn’t just about looks—it’s about [...]
Best Tools for Rust Removal
DIY Rust Management Techniques: Best Tools for Rust Removal Rust can turn a promising project into a frustrating mess before you even get started. If you’ve struggled with stubborn corrosion eating away at your metal [...]
Safely Remove and Prevent Seized Bolts
Essential Automotive Repair Tips: Safely Remove and Prevent Seized Bolts Seized exhaust bolts can turn a simple repair into a frustrating ordeal that eats up your time and tests your patience. If you’ve struggled with [...]