How To Master Engraving With Dremel Tungsten Carbide Rotary Tool Bits
There’s a world of creativity waiting for you as you examine engraving with Dremel tungsten carbide rotary tool bits. These high-performance tools are perfect for adding intricate designs to various materials, from wood to metal. In this guide, you will explore important techniques and tips to help you harness the full potential of your Dremel bits, allowing you to create stunning, professional-quality engravings that showcase your unique style. Get ready to elevate your engraving skills and unleash your artistic vision!
Find more carbide bur die grinder tool bits here
Essential Tools and Materials for Engraving Mastery
Building your engraving toolkit with the right tools and materials can significantly enhance your project outcomes. Aside from your Dremel rotary tool, a variety of accessories like work surfaces, safety gear, and a selection of Tungsten carbide bits will elevate your engraving skills. Always ensure you have good lighting, a comfortable workspace, and materials suitable for engraving, such as glass, wood, and metal, to produce detailed and professional results.
Selecting the Right Dremel Rotary Tool
Choosing the correct Dremel rotary tool can greatly impact your engraving projects. Opt for a versatile model that allows you to adjust speed settings, providing control over finer details and thicker materials. Look for tools equipped with sufficient power and features like variable speed, as this can make a significant difference in achieving precise engravings.
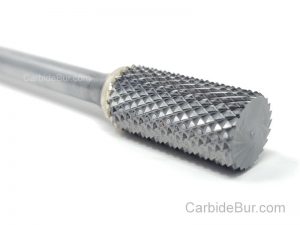
Understanding Tungsten Carbide Rotary Bits
Tungsten carbide rotary bits are highly durable and ideal for engraving a diverse range of materials, including metal and ceramics. Their hardness allows for clean, accurate cuts and engravings, which keeps your work looking polished. This durability prevents wear over time, ensuring that you can depend on them for detailed work without the bits dulling too quickly.
These bits come in various shapes and sizes, allowing you to choose the right tool for the effect you wish to create. Ball-shaped bits excel at creating divots or rounded edges, while pointed bits are perfect for precise line work. When engraving intricate designs, having a range of tungsten carbide bits ensures you can adapt to the specific requirements of your project without compromising detail or quality.
Additional Supplies for Optimal Results
Your engraving toolkit will benefit from a few extra supplies that enhance your projects’ quality. Items like masking tape, for example, can help you outline your designs clearly, while a pencil can assist in sketching your patterns beforehand. Safety glasses and a dust mask are also vital to protect your eyes and lungs during the engraving process.
Additionally, using an appropriate work surface, like a non-slip mat or dedicated engraving board, can make your task more manageable. Having cleaning materials like a brush or air compressor handy will help clear debris from your work surface, allowing for clearer visibility while you engrave. Together, these supplies contribute to a more efficient and effective engraving process, ensuring your completed projects are not only beautiful but safe to create.
Engraving Techniques That Elevate Your Projects
Mastering engraving techniques can truly set your projects apart. From simple designs to complex artwork, the right methods can enhance the aesthetic quality and durability of your work. Experimenting with different styles and techniques can allow you to express your creativity while showcasing a professional finish. Incorporate these techniques into your projects to add uniqueness and detail that will impress anyone who sees them!
Basic Techniques Every Beginner Should Master
Start with foundational techniques such as straight-line engraving, curves, and basic shapes. Focus on controlling your Dremel tool speed and angle to produce clean, consistent lines. Practicing on scrap materials first is beneficial, allowing you to gain confidence in your grip and technique before tackling your final project. Pay attention to the pressure applied on the tool; a light touch often yields the best results.
Advanced Techniques for Intricate Designs
Once you’ve mastered basic techniques, explore into advanced methods like stippling, cross-hatching, and creating gradients. These techniques allow for more dimensional designs, making your work visually captivating. Combining multiple styles can turn an ordinary piece into a stunning masterpiece. Consider using fine tungsten carbide bits for precision, and practice varying the speed and pressure to achieve different effects.
- Stippling for texture and depth.
- Cross-hatching for intricate patterns.
- Gradient shading to create light and shadow effects.
| Stippling | Creating texture by dotting the surface. |
| Cross-hatching | Using intersecting lines to create shading. |
| Gradient Shading | Blending tones for a smooth transition. |
With advanced techniques, your designs become more than just flat engravings. Incorporate varying depths and textures to enhance the visual interest of your projects. Utilizing tools like different cutting bits helps create these effects, resulting in artwork that feels alive and dynamic. The more you practice, the more you will identify which combinations work best for your unique style.
- Practice layering techniques to build complexity.
- Experiment with different bit sizes for varied results.
- Utilize templates for intricate designs and consistent patterns.
Layering and Shading: Adding Depth to Your Work
Layering and shading techniques enable you to add dimension to your engravings, transforming them from flat images into more profound, three-dimensional designs. By using overlapping lines and varying depths, you can create an intricate play of light and shadow that draws the viewer in. This depth not only beautifies the piece but also emphasizes certain elements, allowing your work to convey a richer narrative.
Experimenting with layering can open up endless possibilities in your engraving projects. By applying different shades and depths in your designs, you can bring out textures and details in a way that captivates your audience. Consider incorporating a mix of fine and thicker bits to refine the layers, ensuring that highlights and shadows are effectively distinguished. Balancing these elements can elevate a simple engraving into a stunning work of art.
Find more carbide bur die grinder tool bits here
Common Pitfalls and How to Avoid Them
Engraving can be a rewarding yet challenging endeavor. Many beginners encounter avoidable missteps that can hinder their progress. Common pitfalls, such as selecting the wrong bit or applying too much pressure, can lead to undesirable results. To elevate your engraving game, adopting effective techniques and maintaining awareness of these common mistakes will make a significant difference in the quality of your work and your overall satisfaction.
The Most Frequent Beginner Mistakes
Beginners often face several common mistakes while engraving, such as using the wrong speed settings on their Dremel or engaging the bit at the wrong angle. Overlooking surface preparation can also result in mistakes, as a clean and secure workpiece is important for precision. Additionally, rushing through the process often leads to errors; patience allows you to refine your technique and achieve cleaner lines.
Troubleshooting Engraving Issues
Problems are an inevitable part of learning any craft, including engraving. Issues such as inconsistent depth, uneven lines, or an unfinished look can arise during your projects. Addressing these challenges requires an understanding of both the tools and techniques at your disposal. By identifying specific issues, you can adapt your approach and improve your results significantly.
For inconsistent depth, check your Dremel’s speed setting and pressure applied during engraving. A common solution for uneven lines includes adjusting your hand posture and practicing smooth, consistent movements. If you’re struggling with achieving an even finish, consider altering your engraving technique or switching to a different bit better suited for your design. Regular practice paired with these troubleshooting tips leads to steady improvement.
Proper Maintenance of Your Tools
Maintaining your Dremel and rotary bits is important for optimal performance and longevity. Routine cleaning and inspection of your tools help prevent issues that can disrupt your engraving process. Familiarize yourself with proper storage practices and regularly check for signs of wear or damage on your bits, addressing any issues promptly to avoid diminished effectiveness.
Taking the time to clean your bits after each use will significantly enhance their lifespan. Use a soft brush to remove debris and a cloth for any remaining residue. Storing your tools in a dry, secure area protects them from moisture and accidental damage. Regularly inspecting for sharpening needs will ensure that you’re always working with tools that deliver the best results, leading to smoother and more precise engraving outcomes.
Creative Projects to Test Your Skills
Engraving offers endless opportunities for creative expression and can be the perfect medium to test your skills. Start with small projects that allow you to explore different techniques and materials, whether it’s personalizing everyday items or crafting artistic masterpieces. These projects not only improve your proficiency with the Dremel tungsten carbide bits but also provide unique gifts or décor items that showcase your talents.
Personalized Gifts and Home Décor
Crafting personalized gifts is a fantastic way to apply your engraving skills while making cherished mementos for friends and family. Items such as keychains, picture frames, and wine glasses can be transformed with engraved names, dates, or quotes, adding a sentimental touch. Personalized home décor, like custom coasters or decorative plates, elevate your living space and impress guests.
Artistic Expressions: Engraving on Different Materials
Experimenting with various materials can broaden your artistic repertoire. You can engrave on wood, glass, metal, and acrylic, each presenting unique challenges and results. Wood has a warm, organic aesthetic, while acrylic offers vibrant colors and a contemporary look. Metal provides a sleek finish, and glass can add elegance to your creations through intricate designs.
When engraving on different materials, consider the specific properties and characteristics of each. For instance, hardwood can display deep textures, while softwoods require a lighter touch to prevent splintering. Glass will reflect light beautifully but needs careful handling to avoid breakage. Understanding these nuances allows you to refine techniques that mesh perfectly with each material, elevating your artistry and ensuring stunning results.
Collaborating with Other Craftsmanship Techniques
Integrating engraving with other craftsmanship techniques can yield innovative and stunning results. Combining techniques like painting or woodworking with engraving allows you to layer textures and designs, creating visually striking pieces. For example, etched glass can be paired with painted artwork for a more dynamic display.
Consider merging engraving with techniques like resin casting or decoupage to add depth and dimension to your projects. By layering engraved pieces within resin, you create captivating, glossy finishes that encapsulate your designs. Similarly, engraving on existing decoupage can enhance the visual storytelling of your craftsmanship, embracing a mixed-media approach that melds precision with creativity for truly unique creations.
Expert Insights: Secrets from Professional Engravers
Learning from seasoned engravers can elevate your skills dramatically. Professionals emphasize the importance of practice and experimentation, using various Dremel tungsten carbide bit sizes for different effects. They suggest developing a steady hand through repeated strokes on practice materials before moving to your final piece. Knowledge of the material you’re engraving also plays a key role; harder materials require slower, more precise techniques, while softer materials allow for more aggressive approaches. By incorporating these insights, you can refine your own engraving practices with confidence.
Best Practices for Speed and Precision
Achieving speed and precision in engraving involves a blend of technique and familiarity with your tools. Always maintain a consistent hand position, and apply even pressure while moving your Dremel tool smoothly across the surface. Use a laser guide or steady your hand on a surface for additional control. Find the right balance between speed and detail; working too quickly can lead to mistakes but moving too slowly may compromise the final outcome. Aim for a rhythmic motion that allows you to maintain focus on your design.
Emerging Trends in Engraving with Dremel Tools
Recent advancements in engraving with Dremel tools highlight an exciting shift toward creativity and innovation. Users increasingly incorporate LED lighting and digital design techniques to elevate traditional engraving methods. Additionally, the rise of DIY and custom projects fuels demand for personalized engravings in home decor and gift items. Embracing these trends allows you to expand your repertoire and appeal to wider audiences looking for unique, handcrafted products.
The incorporation of digital design software is transforming how engravers approach projects. Tools like laser engraving machines are blending seamlessly with Dremel techniques, allowing for precise, replicable designs. Many artists are now using integrated apps to plan their projects digitally before committing to a physical surface, leading to cleaner results and less waste. This merging of technology with traditional engraving methods is fostering a new era of creativity—empowering you to push artistic boundaries further than ever before.
The Future of Engraving: Techniques on the Horizon
As technology continues to evolve, so do the techniques employed by engravers. The expansion of CNC (computer numerical control) engraving machines presents opportunities for intricate designs previously unattainable with manual tools. This technology allows for faster production without sacrificing quality, which is particularly beneficial for commercial projects. Additionally, advancements in material science are introducing more versatile engraving materials, enabling you to explore diverse applications from jewelry to industrial parts.
Looking forward, the potential for augmented reality (AR) to assist in engraving is another exciting frontier. Imagine visualizing your design in real-time through AR technology before executing it on your surface. Such developments could revolutionize design accuracy and enhance the overall engraving experience. As you stay attuned to these emerging techniques and technologies, you’ll be well-equipped to adapt and innovate in your engraving endeavors, ensuring a bright future for your craft.
Summing Up
Taking this into account, mastering engraving with Dremel tungsten carbide rotary tool bits requires practice, precision, and the right techniques. By understanding the importance of choosing the appropriate bit, maintaining proper speed, and applying the right amount of pressure, you can elevate your engraving projects to new heights. Always experiment with different materials and settings to find the best combination for your specific tasks. With dedication and the insights provided, you can enhance your skills and achieve professional-quality results in your engraving endeavors.
Find more carbide bur die grinder tool bits here
How to use a die grinder
How to use a die grinder Most people treat a die grinder like just another power tool, but it can do so much more when you know the right moves. If you’ve ever struggled with [...]
How to Choose the Best Rotary Burr for Your Stainless Steel Exhaust Work
How to Choose the Best Rotary Burr for Your Stainless Steel Exhaust Work Most rotary burrs burn out fast when handling stainless steel exhausts. You need a burr that cuts tough metal without losing its [...]
The Best Tools for Cutting Hardened Steel
From Blades to Torches: The Best Tools for Cutting Hardened Steel Cutting hardened steel isn’t just tough—it demands the right tools and techniques to get the job done without wearing you down. You’ve probably faced [...]
The Secret to Success with Carbide Burrs
Woodworking & Metalworking Tools: The Secret to Success with Carbide Burrs Working in tight spaces often means settling for tools that just barely fit—until now. The best carbide burr for tight spaces lets you handle [...]
Exploring Common Vibration Causes in Carbide Burrs
The Vibrant Truth: Exploring Common Vibration Causes in Carbide Burrs Vibration in your carbide burr can throw off your work and damage materials faster than you think. Many machinists overlook how improper mounting or unbalanced [...]
The Best Burrs for Cylinder Head Optimization
Professional Porting Made Easy: The Best Burrs for Cylinder Head Optimization Forget the guesswork when choosing carbide burrs for porting cylinder heads. Picking the right burr can make a huge difference in airflow and engine [...]
Tips for Choosing the Perfect Carbide Burr Set
Mastering DIY Metalworking: Tips for Choosing the Perfect Carbide Burr Set Picking the right carbide burr set can make or break your metalworking projects. Many DIY enthusiasts struggle to find tools that fit every task, [...]
Enhancing Your Weld Grinding Skills
Tool Selection and Safety Precautions: Enhancing Your Weld Grinding Skills Many welders don’t realize how much damage a simple grinding mistake can cause to weld integrity. Using the wrong tool or applying too much pressure [...]
Comparing Double and Single Cut Burrs
Fabrication Tools Spotlight: Comparing Double and Single Cut Burrs Most fabricators face the same challenge: choosing the right burr for the job. Double cut carbide burrs have outpaced single cut versions in metal shaping tools [...]
Empowering Your Projects with Carbide Burrs and Titanium
From Aerospace to Automotive: Empowering Your Projects with Carbide Burrs and Titanium Cutting titanium is no easy task. Its toughness and tendency to harden under pressure can stall even the best tools. Carbide burrs, known [...]
Perfecting Aluminum Porting for Improved Airflow
Engine Enthusiasts' Guide to Burr Shapes: Perfecting Aluminum Porting for Improved Airflow Most people think any burr shape works for aluminum porting. That’s why so many end up battling sticky residue and uneven airflow. Choosing [...]
The Ultimate Guide to Using Die Grinders in Metal Fabrication
The Ultimate Guide to Using Die Grinders in Metal Fabrication Most metal fabricators struggle with using die grinders without wasting time or damaging their work. You might own the right tools but still miss key [...]